Kitchen Lighting Design: A Complete Guide to Getting It Right
How to plan kitchen lighting that actually works — from the three essential layers to colour temperature, dimming systems, and the mistakes that ruin otherwise beautiful kitchens.
There is a particular kind of disappointment that comes with finishing an expensive kitchen and realising the lighting is wrong. The cabinetry is beautiful. The worktops are exquisite. The appliances are precisely what you wanted. And yet the room feels flat, or harsh, or oddly gloomy in the corners — and you can't quite explain why.
The answer is almost always lighting. Or rather, the lack of considered lighting design.
Kitchen lighting is one of those subjects that sounds straightforward until you start doing it properly. It is not a matter of choosing attractive pendants and scattering some downlights across the ceiling. It is a design discipline in its own right, and in a room where you chop vegetables, entertain friends, help with homework, and occasionally eat toast over the sink at midnight, getting it right matters enormously.
This guide covers everything we've learnt about kitchen lighting design across years of creating bespoke kitchens for homes along the M11 corridor and beyond. Consider it a practical companion to the decisions ahead.
The Three Layers of Kitchen Lighting
Every well-lit kitchen relies on three distinct types of lighting working in concert. Miss one and the room will never feel quite right.
Ambient Lighting
Ambient lighting is the general, room-filling light that allows you to walk in, see where everything is, and move about safely. It is the baseline — the layer that replaces daylight when the sun goes down.
In most kitchens, ambient light comes from recessed downlights, flush ceiling fittings, or — in rooms with generous proportions — a central pendant or lantern. The goal is even, comfortable illumination without harsh shadows or glare.
The mistake most people make with ambient lighting is treating it as the only lighting. A kitchen lit solely by a grid of ceiling downlights will feel functional but lifeless. Ambient light provides the canvas. The other two layers provide the interest.
Task Lighting
Task lighting is directed, focused light positioned exactly where you need it for specific activities: chopping on the worktop, reading a recipe, checking whether the onions are caramelised or merely translucent.
Under-cabinet lighting is the most common and most effective form of task lighting in a kitchen. Strip LEDs or linear fittings mounted beneath wall cabinets cast an even wash of light directly onto the worksurface below, eliminating the shadows your own body creates when you stand between the ceiling light and the chopping board.
Task lighting also includes directional fittings over the hob, adjustable spots above a breakfast bar, and focused light inside larder cupboards so you can actually distinguish the cumin from the coriander.
Accent Lighting
Accent lighting is the layer that gives a kitchen its soul. It highlights architectural features, draws attention to beautiful objects, and creates depth and warmth in the room.
In a bespoke kitchen, accent lighting might include LED strips inside glass-fronted cabinets, uplighting above tall units, a pair of elegant wall sconces flanking a range cooker, or subtle light washing across a textured splashback. It is the layer that makes guests say the room feels wonderful without being able to pinpoint exactly why.
Accent lighting should always be on its own circuit — preferably dimmed — so it can operate independently of the brighter task and ambient layers. On a quiet evening, accent lighting alone can transform a kitchen from a workspace into one of the most inviting rooms in the house.
Why Lighting Must Be Planned Early
If there is a single piece of advice worth taking from this guide, it is this: plan your kitchen lighting at the very beginning of the design process.
Lighting is infrastructure. It requires wiring concealed in walls and ceilings, switch positions determined before plaster goes up, and transformer locations planned before carcasses are built. Retrofitting lighting into a finished kitchen ranges from difficult to impossible without visible compromise.
At Albury House, we design the lighting scheme in parallel with the kitchen layout. Every worktop gets task lighting. Every display area gets accent lighting. Every circuit is independently switchable. And all of it is resolved on paper before a single wire is pulled. This is not perfectionism for its own sake — it is the only way to achieve a result that feels seamless.
If your project involves a new-build or a significant renovation, coordinate with your electrician and your kitchen designer simultaneously. First fix is the critical window. Once the ceiling is boarded and skimmed, your lighting options contract sharply.
A Tour of Kitchen Lighting Types
Under-Cabinet Lighting
Under-cabinet lighting is, pound for pound, the most effective lighting in any kitchen. A continuous strip of warm LED light beneath your wall units transforms the working surface below, making food preparation easier, safer, and more pleasurable.
The best under-cabinet lighting is:
- Continuous rather than spotty — a linear LED strip or slim profile gives an even wash of light without the scalloped hot spots that individual puck lights create
- Concealed from view — mounted behind a small lip or batten at the front edge of the cabinet so you see the light, not the source
- Warm in tone — 2700K to 3000K complements timber worktops, stone surfaces, and the natural colours of food
- Separately switched — so it can serve as gentle background light when the main ceiling fittings are off
In a bespoke kitchen, the lighting channel can be integrated into the cabinet design itself, creating a detail so clean it appears architectural rather than applied.
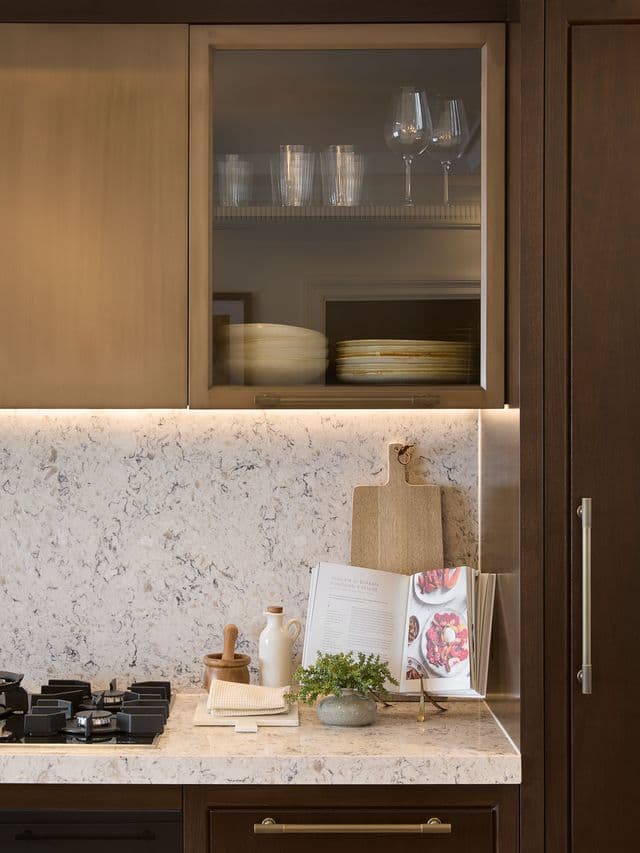
In-Cabinet and Display Lighting
Glass-fronted cabinets, open shelving, and glazed dressers come alive with interior lighting. A soft glow behind glassware or inside a china display adds warmth, depth, and a sense of occasion to the room.
LED strip lighting on the inside edges of cabinet frames works well here. Choose a warm colour temperature — cooler light inside a cabinet tends to look sterile — and ensure the LEDs are concealed behind the frame so you see illuminated objects, not a visible light source.
In-drawer lighting is another bespoke detail worth considering. A subtle LED strip that activates when the drawer opens makes deep pan drawers and cutlery trays genuinely easier to navigate. It is the kind of quiet refinement that you never knew you needed until you have it.
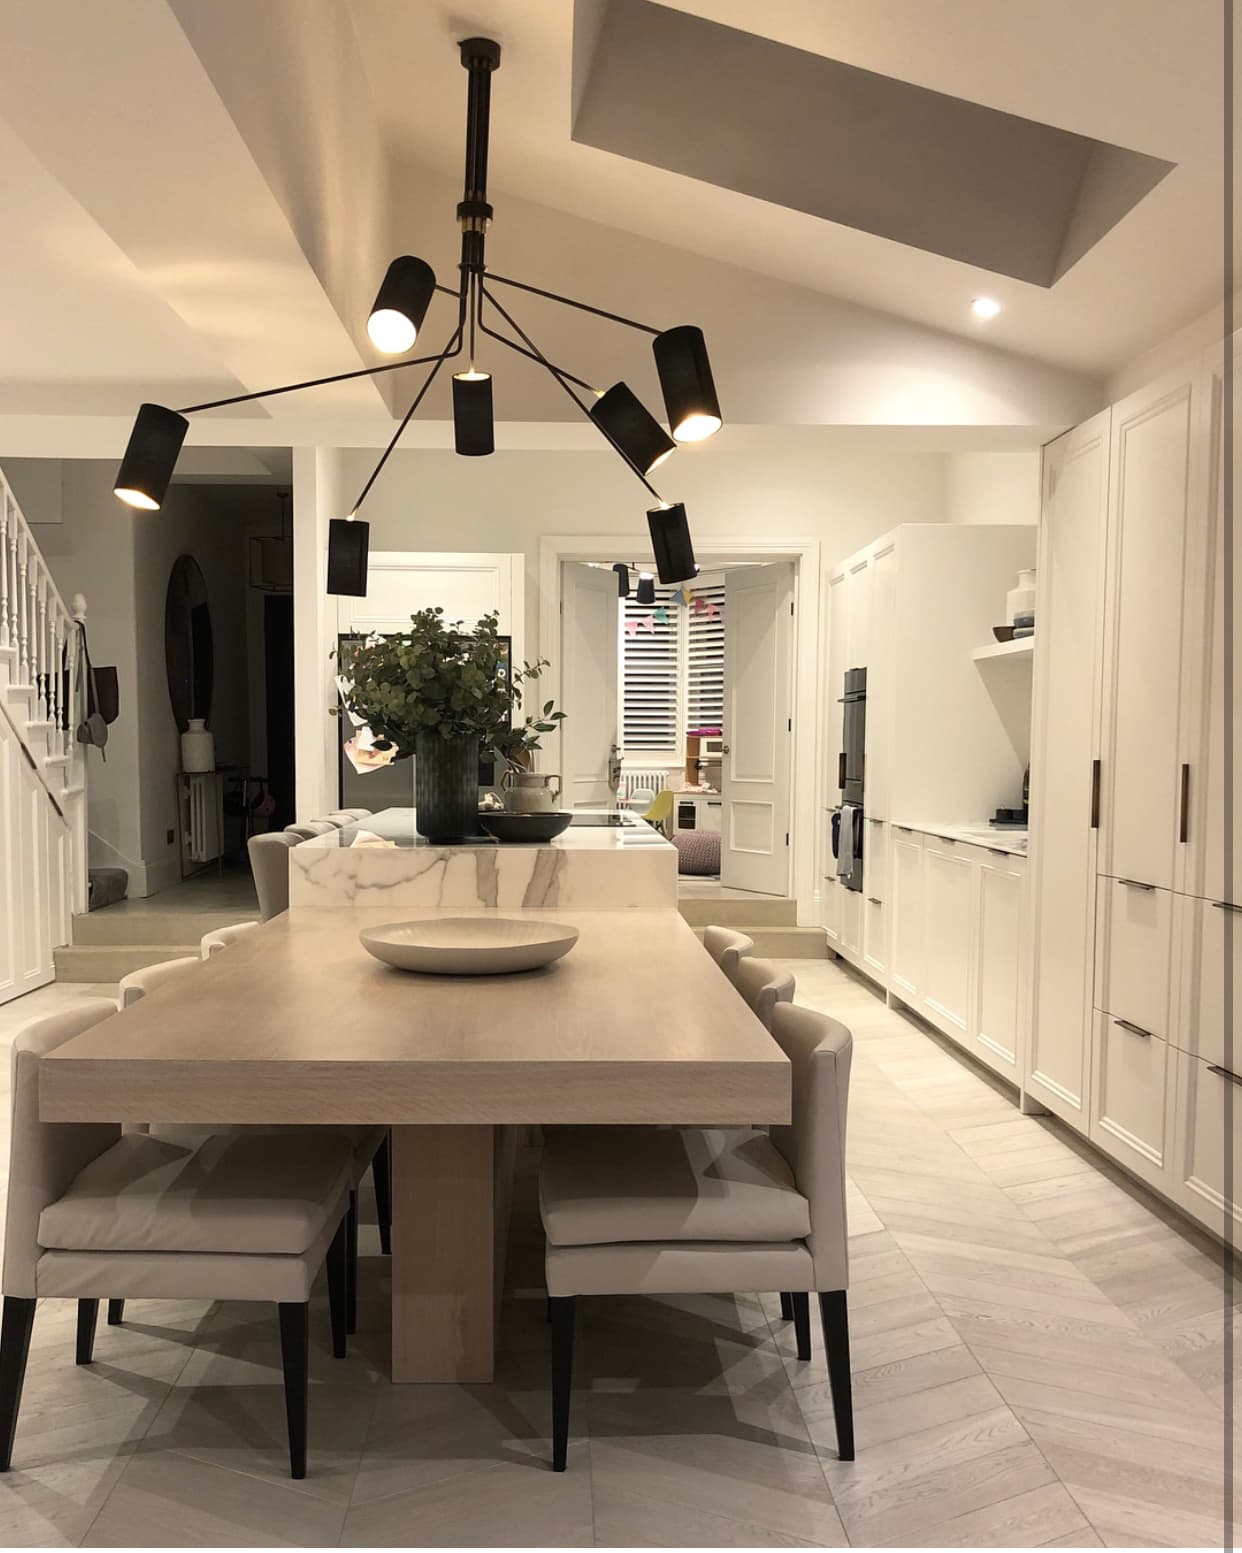
Pendant Lights Over Islands
A pendant light — or more commonly a pair or trio of pendants — above a kitchen island is one of the most visible lighting decisions in the room. Get it right and the pendants become a defining feature. Get it wrong and they dominate the space for all the wrong reasons.
Some principles worth observing:
- Scale matters enormously. Pendants that are too small above a large island look timid and lost. Pendants that are too large feel oppressive. As a starting point, the diameter of each pendant should be roughly one-third the width of the island, but trust your eye over any formula.
- Height is critical. Too low and they obstruct sightlines across the room. Too high and they lose their intimacy and fail to light the island surface effectively. For most kitchens, the bottom of the pendant should sit approximately 700 to 800mm above the island worktop.
- Odd numbers tend to work better. A single pendant or a row of three creates a more natural rhythm than two, which can feel static.
- Dimmability is essential. Pendants over an island will serve as task lighting when you're preparing food and as ambient atmosphere when you're having supper. They need to do both.
Choose pendants that complement the kitchen's character without competing with it. In a room full of carefully considered cabinetry and materials, a lighting fixture should feel like a natural part of the composition rather than a statement piece imported from a different mood entirely.
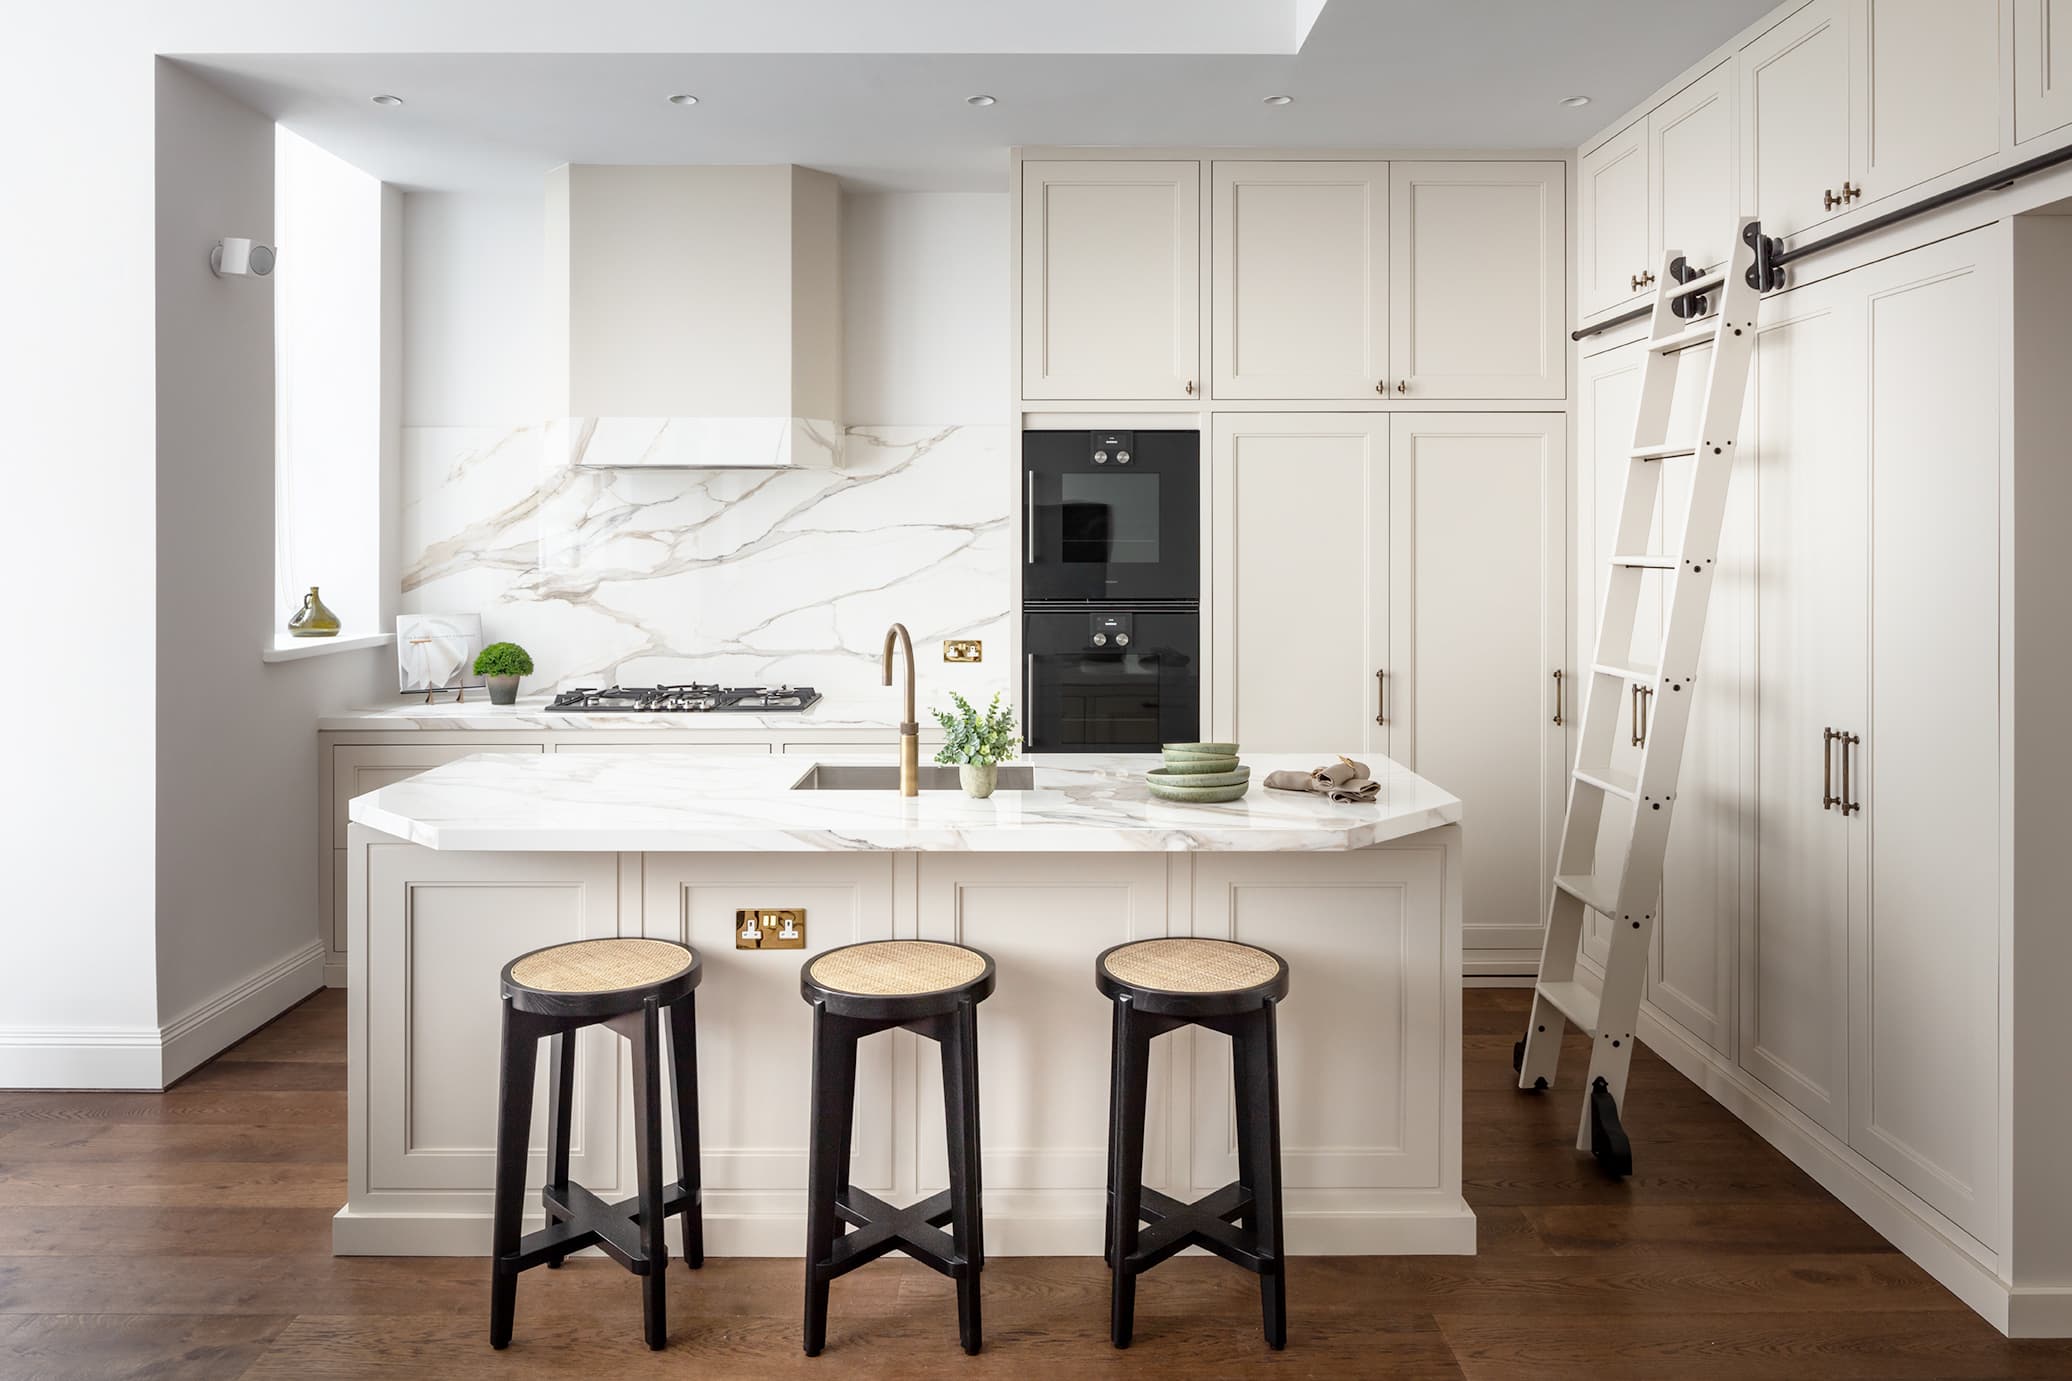
Recessed Downlights
Recessed downlights are the workhorses of kitchen ambient lighting. Invisible when done well, painfully obvious when done badly.
The most common error is installing too many on a single circuit, positioned in a rigid grid, all at the same brightness. The result is a flat, even wash of light that eliminates shadow entirely — and with it, all sense of warmth and dimension. A kitchen is not a supermarket. It should not be lit like one.
Better practice:
- Use fewer downlights than you think you need, supplemented by task and accent lighting from other sources
- Position them where they're useful — over circulation routes, above the sink, near the entrance — rather than in an arbitrary grid
- Choose fittings with a narrow-to-medium beam angle (24 to 36 degrees) for more focused pools of light rather than a flat flood
- Put them on a dimmer circuit so you can dial back the intensity when the room shifts from cooking mode to dining mode
- Select a consistent colour temperature across all downlights — mixing warm and cool fittings in the same ceiling looks discordant
Fire-rated, IP65-rated downlights are standard for kitchen ceilings, and adjustable or gimbal models allow you to direct light precisely where it is most needed.
Architectural and Shadow-Gap Lighting
For those designing a kitchen where architecture and cabinetry are intended to feel of a piece, architectural lighting offers a level of refinement that individual fittings cannot match.
Shadow-gap lighting — a recessed LED channel set into the junction between wall cabinets and ceiling, or between a plinth and the floor — creates a floating, weightless effect that makes cabinetry appear to hover. It is a detail borrowed from high-end architectural practice and it works beautifully in contemporary bespoke kitchens.
Plinth lighting, where a subtle strip of light washes the floor beneath base cabinets, serves a similar purpose. It softens the visual weight of the cabinetry, provides gentle orientation lighting at night, and creates a sense of depth at the base of the room.
These details need to be planned from the outset. The LED channels, drivers, and wiring must be integrated into the cabinetry and building fabric during design — they cannot be convincingly added later.
Natural Light: The Layer You Cannot Buy
No discussion of kitchen lighting design is complete without acknowledging the most important light source of all: daylight.
The quality, direction, and quantity of natural light in your kitchen influences every other lighting decision. A north-facing kitchen with modest windows will rely more heavily on artificial light — and warm artificial light at that — whilst a south-facing room flooded with sun may need almost no electric light during the day.
Consider how natural light enters the room at different times. Morning light from the east is gentle and warm. Afternoon sun from the west can be intense and may cause glare on worksurfaces. Rooflights and skylights introduce light from above, which is the most even and flattering of all.
Where possible, design the kitchen layout so that primary work surfaces receive good natural light. Placing a sink beneath a window is a cliché for a reason — it works. Equally, positioning an island where it catches light from a rooflight above creates a naturally inviting workspace.
When artificial lighting is needed to supplement daylight, match the colour temperature to the quality of light outside. Warm LEDs (2700K) blend seamlessly with afternoon sun. Cooler tones feel natural on bright, overcast days. This is where tuneable-white LED systems earn their keep, though they add complexity and cost that not every project warrants.
Dimming and Control Systems
A kitchen without dimming is a kitchen with only two modes: on and off. This is roughly as useful as a cooker with only one temperature.
Every lighting circuit in a kitchen should be independently dimmable. This allows you to create scenes — bright and functional for Saturday morning cooking, subdued and atmospheric for Thursday evening supper, soft and navigational for the midnight snack.
Modern LED dimming is excellent when the components are properly matched. The critical points:
- Use a dimmer designed for LED loads. Older leading-edge dimmers designed for halogen bulbs will cause LED fittings to flicker, buzz, or refuse to dim smoothly. Trailing-edge or universal LED dimmers are the correct choice.
- Check compatibility. Not every LED fitting works with every dimmer. Reputable manufacturers publish compatibility lists — consult them. There is nothing more irritating than a brand-new kitchen with flickering lights.
- Consider scene-setting controls. A simple two-gang dimmer plate can control ambient and task lighting independently. More sophisticated systems — from companies like Lutron or Rako — allow you to programme preset scenes activated by a single button or a phone.
- Plan switch positions carefully. You need lighting control at every entrance to the kitchen and at key working positions. A beautiful kitchen where you must walk to the far wall to turn the lights on has failed at a basic level.
For clients with larger homes or integrated smart systems, kitchen lighting can be incorporated into whole-house automation. But even in a modest kitchen, two or three independent dimmer circuits will transform how the room feels at different times of day.
LED Colour Temperature: Warm, Cool, and Everything Between
Colour temperature — measured in Kelvin — describes whether a light source appears warm and golden or cool and blue-white. It is, after brightness, the single most important characteristic of any light fitting in your kitchen.
The scale runs from roughly 2200K (the warm amber of a candle) through 2700K (the soft warmth of a traditional incandescent bulb) to 4000K (a neutral, clinical white) and beyond to 6500K (harsh daylight simulation).
For domestic kitchens, the sweet spot sits between 2700K and 3000K. This range produces light that:
- Flatters natural materials — timber, stone, and painted finishes all look their best under warm light
- Makes food look appealing — warm light enhances the natural colours of ingredients and cooked dishes
- Complements skin tones — important in a room where you spend time with family and guests
- Creates a sense of comfort and welcome, even in a large or contemporary space
Task lighting can sit marginally higher — 3000K to 3500K — where additional clarity is needed for food preparation. But avoid mixing dramatically different colour temperatures in the same sightline. A warm pendant above the island next to a cool downlight in the ceiling creates a visual discord that the eye registers even if the mind cannot name it.
One further consideration: Colour Rendering Index (CRI). This measures how accurately a light source reveals the true colours of objects. Choose fittings with a CRI of 90 or above. Lower CRI ratings make colours appear flat and washed out — the difference is subtle but pervasive, particularly in a room full of carefully chosen materials.
Lighting for Different Kitchen Zones
A well-designed kitchen is not one room but several zones, each with its own purpose and its own lighting needs.
The Preparation Zone
Worktops where you chop, mix, and assemble need the brightest, most even task lighting in the kitchen. Under-cabinet LEDs are the primary source here, supplemented by ambient downlights. Shadows across a chopping board are not merely an aesthetic problem — they are a safety issue.
The Cooking Zone
The hob and oven area needs focused light from above. Many cooker hoods include integrated lighting, though the quality varies enormously. If your extraction is a ceiling-mounted unit or a downdraft system, plan dedicated task lighting above the cooking surface. Avoid placing pendant lights directly above a hob — they collect grease and heat.
The Dining Zone
If your kitchen includes a dining table or a breakfast bar, this area benefits from a different quality of light: softer, warmer, and more intimate than the working zones. A pendant or a pair of pendants on a dimmer circuit works well. The light should illuminate the table and the faces around it without flooding the wider room.
The Display Zone
Open shelving, glass cabinets, a collection of cookbooks, or a beautiful splashback — these are opportunities for accent lighting that rewards the investment in materials and craftsmanship. LED strips, small directional spots, or picture lights can draw the eye to the details that make your kitchen individual.
The Transition Zone
The entrance to the kitchen, the route between cooking and dining areas, and any corridor-like sections of the room need gentle ambient or orientation lighting. This is where plinth lighting and low-level wall washers earn their place, providing safe passage without overpowering the mood.
Common Kitchen Lighting Mistakes
In our experience, these are the errors that appear most frequently — and cause the most regret:
Planning lighting last. Treating it as an afterthought rather than a fundamental part of the kitchen design. By the time you think about it seriously, the ceiling is finished and your options are limited.
Relying on a single type of light. A ceiling full of downlights and nothing else produces flat, institutional illumination. Layer, layer, layer.
Choosing the wrong colour temperature. Cool white light (4000K and above) in a domestic kitchen feels clinical and unwelcoming, regardless of how beautiful the cabinetry is.
Forgetting dimmers. Fixed-brightness lighting cannot adapt to the many different moods a kitchen must serve throughout the day.
Oversizing pendant lights. A dramatic pendant makes a statement, but if it blocks sightlines across an island or overwhelms the room, the statement is the wrong one.
Ignoring the quality of the light source. Cheap LED fittings with poor CRI ratings will undermine thousands of pounds of investment in worktops and finishes. Specify quality fittings with CRI 90+ and smooth dimming performance.
Placing switches in impractical locations. You should be able to control your kitchen lighting from where you naturally enter the room — not from the far corner behind the fridge.
Working With Your Electrician
Good kitchen lighting is a collaboration between three parties: the kitchen designer, the lighting planner (who may be the same person), and the electrician who makes it all work.
The electrician needs a detailed lighting layout before first fix — showing the position of every fitting, every switch, every transformer, and every cable route. In a bespoke kitchen project, this drawing is produced as part of the design process and coordinated with the cabinetry plans so that nothing conflicts.
Key points to discuss with your electrician:
- Circuit separation — ambient, task, and accent lighting should be on independent circuits so each can be controlled separately
- Dimmer compatibility — confirm that the specified dimmers work with the specified LED fittings before any wiring begins
- Driver and transformer locations — LED strip lighting requires drivers that need to be accessible for maintenance but hidden from view. Plan their location within cabinetry or in a nearby void.
- Future-proofing — even if you are not installing a smart lighting system now, running a few extra cables to key positions costs very little during first fix and preserves the option for later
A skilled electrician who has worked on bespoke kitchen projects before is worth seeking out. The wiring requirements are more complex than a standard domestic installation, and the tolerance for visible cable runs or poorly positioned fittings is zero.
Bringing It All Together
The best kitchen lighting is the kind you never consciously notice. The room simply feels right — warm and welcoming when you walk in, bright and functional when you need to cook, soft and atmospheric when the evening arrives. That effortless quality is, of course, the product of careful thought applied long before the first fitting was installed.
If you are beginning to plan a new kitchen project, we would encourage you to think about lighting from day one. Consider it not as an accessory to the kitchen but as an integral part of the design — as fundamental as the cabinetry, the worktops, and the layout.
We design lighting schemes as part of every Albury House kitchen project, working with our clients and their electricians to ensure the result is seamless, practical, and beautiful. If you would like to discuss your plans, we are always happy to talk.
Frequently Asked Questions
Thinking about a new kitchen?
Book Your Free ConsultationYou might also enjoy
Bespoke Kitchen Cabinets: The Definitive Guide to Handmade Cabinetry
Everything you need to know about bespoke kitchen cabinets — from construction methods and timber selection to door styles, finishes, and the details that distinguish genuine craftsmanship from the merely expensive.
Bespoke Kitchen Joinery: The Craft Behind Cabinets That Last Generations
A detailed guide to the joinery techniques used in bespoke kitchen craftsmanship — from dovetail drawers and mortise-and-tenon frames to tongue and groove panels. Learn how to recognise quality joinery and why it determines how long your kitchen will last.
The Bespoke Kitchen Design Process: From Brief to Blueprint
How does a bespoke kitchen get designed? We walk through every stage of the design process — from developing the brief and spatial analysis to 3D visualisation, technical drawings, material specification, and sign-off.